Keyri Ping Identity Integration Guide
Keyri QR login can be incorporated into a new or existing Ping Identity (opens in a new tab) tenant through the DaVinci (opens in a new tab) no-code orchestration platform using the Keyri DaVinci connector (opens in a new tab). The process is similar to that detailed in the server-side authentication documentation, though with the custom backend, where user public keys are stored and authentication signatures subsequently validated, replaced by PingOne and the Keyri DaVinci connector.
Ping Identity DaVinci Environment
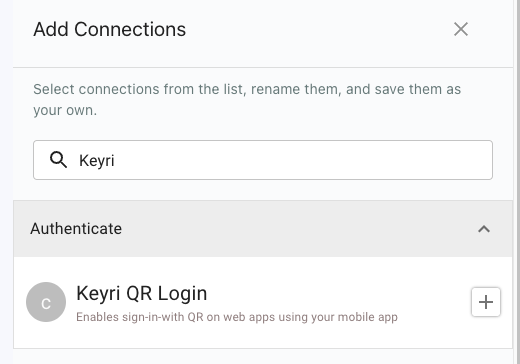
First, install the Keyri connector in your DaVinci environment by searching for it in the "Connections" tab.
Next, insert the connector into your flow as follows:
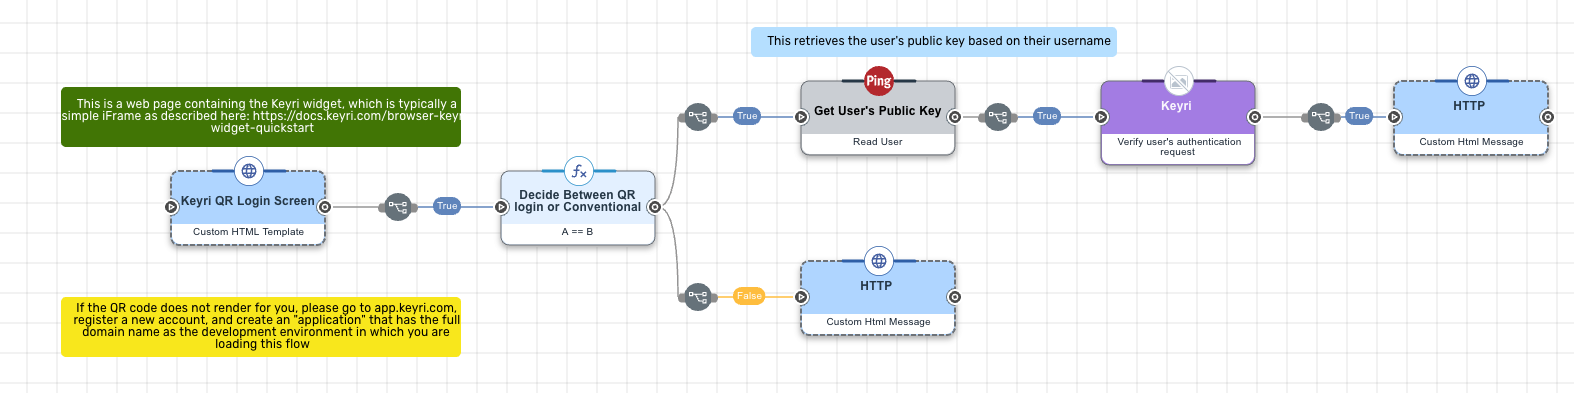
Note that the Keyri connector follows a PingOne connector in which the user's public key is extracted from the PingOne user database based on a user identifier passed to the Keyri frontend widget from your mobile app. The Keyri connector accepts the following three parameters and outputs a boolean indicating the cryptographic validity of the login request:
-
User Public Key: given by the preceding PingOne connector
-
Authentication Challenge: a nonce used to prevent replay attacks, generated by your app when the QR code is scanned
-
User Signature: a signature of the Authentication Challenge generated by the Keyri SDK
Finally, use the boolean output of the Keyri connector to either issue a session token or otherwise further process the user's login request.
Web
Integration of the Keyri QR widget in your Ping-backed web application is the standard process described in the server-side authentication documentation, with the three parameters instead passed to your PingOne endpoint to be processed by the DaVinci flow you set up as described above.
Mobile
Integration
For incorporating Keyri into your Ping-enabled mobile app, please see our documentation for our Mobile SDKs.
Interactions with your Ping Identity tenant, in this example, will be handled through direct API calls. Full Ping API Docs can be found here: https://developer.pingidentity.com/en.html (opens in a new tab). The Ping mobile SDKs may also be used along the same principles outlined below
Register User
First, create a user in Ping's system if one does not exist already. This is a
standard process per Ping's API conventions. Next, use the Keyri SDK to generate
a local association key pair for the device and user - the private key is stored
in the mobile device's TPM, and the public key is stored in Ping's server under
the nickname field for the user. This is accomplished in step 2 in the sample
code below - we call the generateAssociationKey() function for the user, then
PATCH the user object in Ping's server with the nickname.
Step 1
let jsonObject: [String: Any] = [
    "email": "\(username)@example.com",
    "name": [
        "given": "a",
        "family": ".\(username)"
    ],
    "population": [
        "id": "0774f1a6-aea0-4c09-a6d1-82b9e8b2b047"
    ],
    "username": username,
    "department": "engineering",
]

var request = URLRequest(url: URL(string:
"https://api.pingone.com/v1/environments/0930f393-9d60-4e3a-a4e1-4394197537d2/users")!,timeoutInterval:
Double.infinity) request.addValue("application/json", forHTTPHeaderField:
"content-type") request.addValue("Bearer
eyJhbGciOiJSUzI1NiIsImtpZCI6ImRlZmF1bHQifQ.eyJjbGllbnRfaWQiOiI2YjliYTRmMS1lZWNjLTQwNGEtODRlZC1lMDA2Mjg1NWJiNTIiLCJpc3MiOiJodHRwczovL2F1dGgucGluZ29uZS5jb20vMDkzMGYzOTMtOWQ2MC00ZTNhLWE0ZTEtNDM5NDE5NzUzN2QyL2FzIiwiaWF0IjoxNjU2MzQwODAwLCJleHAiOjE2NTYzNDQ0MDAsImF1ZCI6WyJodHRwczovL2FwaS5waW5nb25lLmNvbSJdLCJlbnYiOiIwOTMwZjM5My05ZDYwLTRlM2EtYTRlMS00Mzk0MTk3NTM3ZDIiLCJvcmciOiIwYTAwZGUzOC00Mzk0LTRiYmQtODYxZS04ZTM3MDgyN2VhODgifQ.iOW5Wjk0jRwPiJsa7uWP6gc1qY4OPk9dHYv-O9TzjtbwfzmfQSu329-joBQBG9NmJKzorMHeUJCCQhu2ko7j3Ji3wN_zcmghUOnG8qQW7lxjq4snbOsy-ak0pCIvKakub8-oPmoX_YtsXJLoGNNUR2R9-\_dxr7GpRgW4EsdTZlUirM2dP5ErzeZHQMg_RzR4h52H2CgdQklae_XtNwUZnNol5uJ5qJl52Y8yTjAUa2l3uPLKlg_jceTmIT1uR0kC8ZrBiuiNAK-WHbe875prYcrcoKhPsGQ0wWkEhNuJzDNp_45HeFL018d16uXrVe4M0J9Az0b6x92xPCBJhGt-GA",
forHTTPHeaderField: "Authorization")

request.httpMethod = "POST"

let task = URLSession.shared.dataTask(with: request) { data, response, error in
guard let data = data else { print(String(describing: error)) return }
print(String(data: data, encoding: .utf8)!) }

task.resume()
Step 2
//Step 2 - Patch the nickname

let key = try keyri.generateAssociationKey(username: username)

let parameters = "{\n \"nickname\":
\"\(key.rawRepresentation.base64EncodedString())\"\n}" let postData =
parameters.data(using: .utf8)

var request = URLRequest(url: URL(string:
"https://api.pingone.com/v1/environments/[ENV ID HERE]/users/[USER ID
HERE]")!,timeoutInterval: Double.infinity) request.addValue("application/json",
forHTTPHeaderField: "content-type") request.addValue([Bearer token here],
forHTTPHeaderField: "Authorization")

request.httpMethod = "PATCH" request.httpBody = postData

let task = URLSession.shared.dataTask(with: request) { data, response, error in
guard let data = data else { print(String(describing: error)) return }
print(String(data: data, encoding: .utf8)!) }

task.resume()
Send Login Payload
For this step, we are primarily using Keyri functions to send a secure payload to the browser.
We have examples for how to use Keyri to send a secure payload in our Mobile SDK sections. In the below code block, we cover exactly how to configure the payload in the case of Ping Identity. We create an object with the username, a timestamp, coupled with a randomly generated nonce, and a signature of the timestamp_nonce. the final object looks like this:
{
    username: [username],
    timestamp_nonce: [timesamp]_[nonce],
    signature: [signatureOfTimestamp_Nonce]
}
Below is an example of how to generate the signature. Notice that you can take advantage of Keyri's built-in cryptography functions to generate the signature (though if you want you can always extract the key and do the signature manually). Simply pass this string as the payload (again, see the mobile SDK sections for more detail) and you're all set!
static func generatePayload(for user: String) -> String {
    let keyri = KeyriInterface(appKey: appKey)

    do {
        let date = Date()
        let time = date.timeIntervalSince1970.description

        let randomInt = Int.random(in: 0...999999)
        let timeStr = time + "_" + randomInt.description

        let timeStrData = timeStr.data(using: .utf8)!
        let signature = keyri.generateUserSignature(publicUserId: user, data: timeStrData)

        let JSONRepresentation = "username: \(user), timestamp_nonce: \(timeStr), signature: \(signature.derRepresentation.base64EncodedString())"
        return JSONRepresentation
    } catch {
        return ""
    }
}