Keyri QR Login with Auth0
Incorporating Keyri QR login into your Auth0-enabled app is a straightforward
process entailing sending your user's valid refreshToken from your mobile app,
through the Keyri mobile SDK, to the Keyri QR web widget embedded on your web
app. Scripts, detailed below, on your web app, exchange the refreshToken for
their id_token and access_token. Those can be set into your web app's
LocalStorage or as cookies in order to establish the user's login state on your
web app.
Web
Full source code for a simple Next.js-based application utilizing Keyri QR login with Auth0 is available here: https://github.com/Keyri-Co/keyri-auth0-web (opens in a new tab)
The live demo is visible here: https://keyri-auth0-web.vercel.app/ (opens in a new tab)
The following video outlines the steps required to complete integration of the Keyri QR widget on your Auth0-enabled web app as well as the required Auth0-related API calls and other functions required to finalize authenticating the user.
QR Widget Embedding
First, embed the Keyri QR widget in a div of your choosing. Remember to save the KeyriQR.html file in a publicly-accessible directory on your server and set its location as the src of the Keyri iframe.
<div>
    <p className="lead" data-testid="hero-lead">
      Log in by scanning the QR code below with the example Keyri-Auth0 app.
     </p>
     <iframe
       src="./KeyriQR.html"
       id="qr - frame"
       frameBorder={0}
       height={300}
       width={300}
       scrolling="no"
       style={{ borderWidth: 0 }}></iframe>
 </div>
Event Listener Targeting QR Widget
Now set up an listener for events emitted by the Keyri QR widget - it will emit
a payload after a user has initiated and accepted the QR login. The following is
a React-based example that uses the useEffect hook
useEffect(() => {
  window.addEventListener('message', async (evt) => {
    if (
      evt.data.keyri &&
      evt.data.data &&
      document.location.origin == evt.origin
    ) {
      const { data } = evt;
      if (!data.error) {
        let refresh_token = JSON.parse(data.data).refreshToken;
        await handleQrLogin(refresh_token);
      } else if (data.error) {
        console.log(`Keyri error: ${data.message}`);
      }
    }
  });
}, []);
QR Login Handling Function
Finally, set up a function, referenced in the event listener written above, for
handling the payload emitted by the Keyri widget. This is the part that
exchanges the refreshToken for a usable id_token and access_token.
const handleQrLogin = async (refresh_token) => {
  try {
    // Exchange the refresh token for an access token and id token
    const res = await fetch('https://keyri.us.auth0.com/oauth/token', {
      method: 'POST',
      headers: {
        'content-type': 'application/x-www-form-urlencoded',
      },
      body: new URLSearchParams({
        grant_type: 'refresh_token',
        // The Auth0 client_id and client_secret below must match those of your MOBILE application
        client_id: 'K4RWxNFhsHU7xDTxVqGzW9x2JWlf5ily',
        client_secret:
          '7RlMb6UVQrThv6bhnhi-ZlYPKH5to8UPstuMmCrefBsSCgnMwe2O_iDUxLX5gEIg',
        refresh_token: refresh_token,
      }),
    });
    const data = await res.json();

    // Localstorage is not accessed in this example, but you can use it to store the tokens that the Auth0 API returns
    localStorage.setItem('access_token', data.access_token);
    localStorage.setItem('id_token', data.id_token);

    // Decode the JWT to get the user's id
    const jwt = data.id_token.split('.')[1];
    const decodedJwt = JSON.parse(atob(jwt));

    // Set the logged in state
    setUserId(decodedJwt.sub);
    setAuthenticated(true);
  } catch (error) {
    console.log(error);
  }
};
Mobile
Source code for an example iOS app that works with the Auth0 web project outlined above is available here: https://github.com/Keyri-Co/auth0-iOS (opens in a new tab)
The following video details how to set up your Auth0 project and how to send the
user's refreshToken as the payload when initiating Keyri QR login.
Some specific configurations are required on Auth0 to make Keyri QR login work without compromising security.
Create Mobile Application on Auth0

On Auth0's console, create a new application and select Native.
Configure URIs for Mobile App
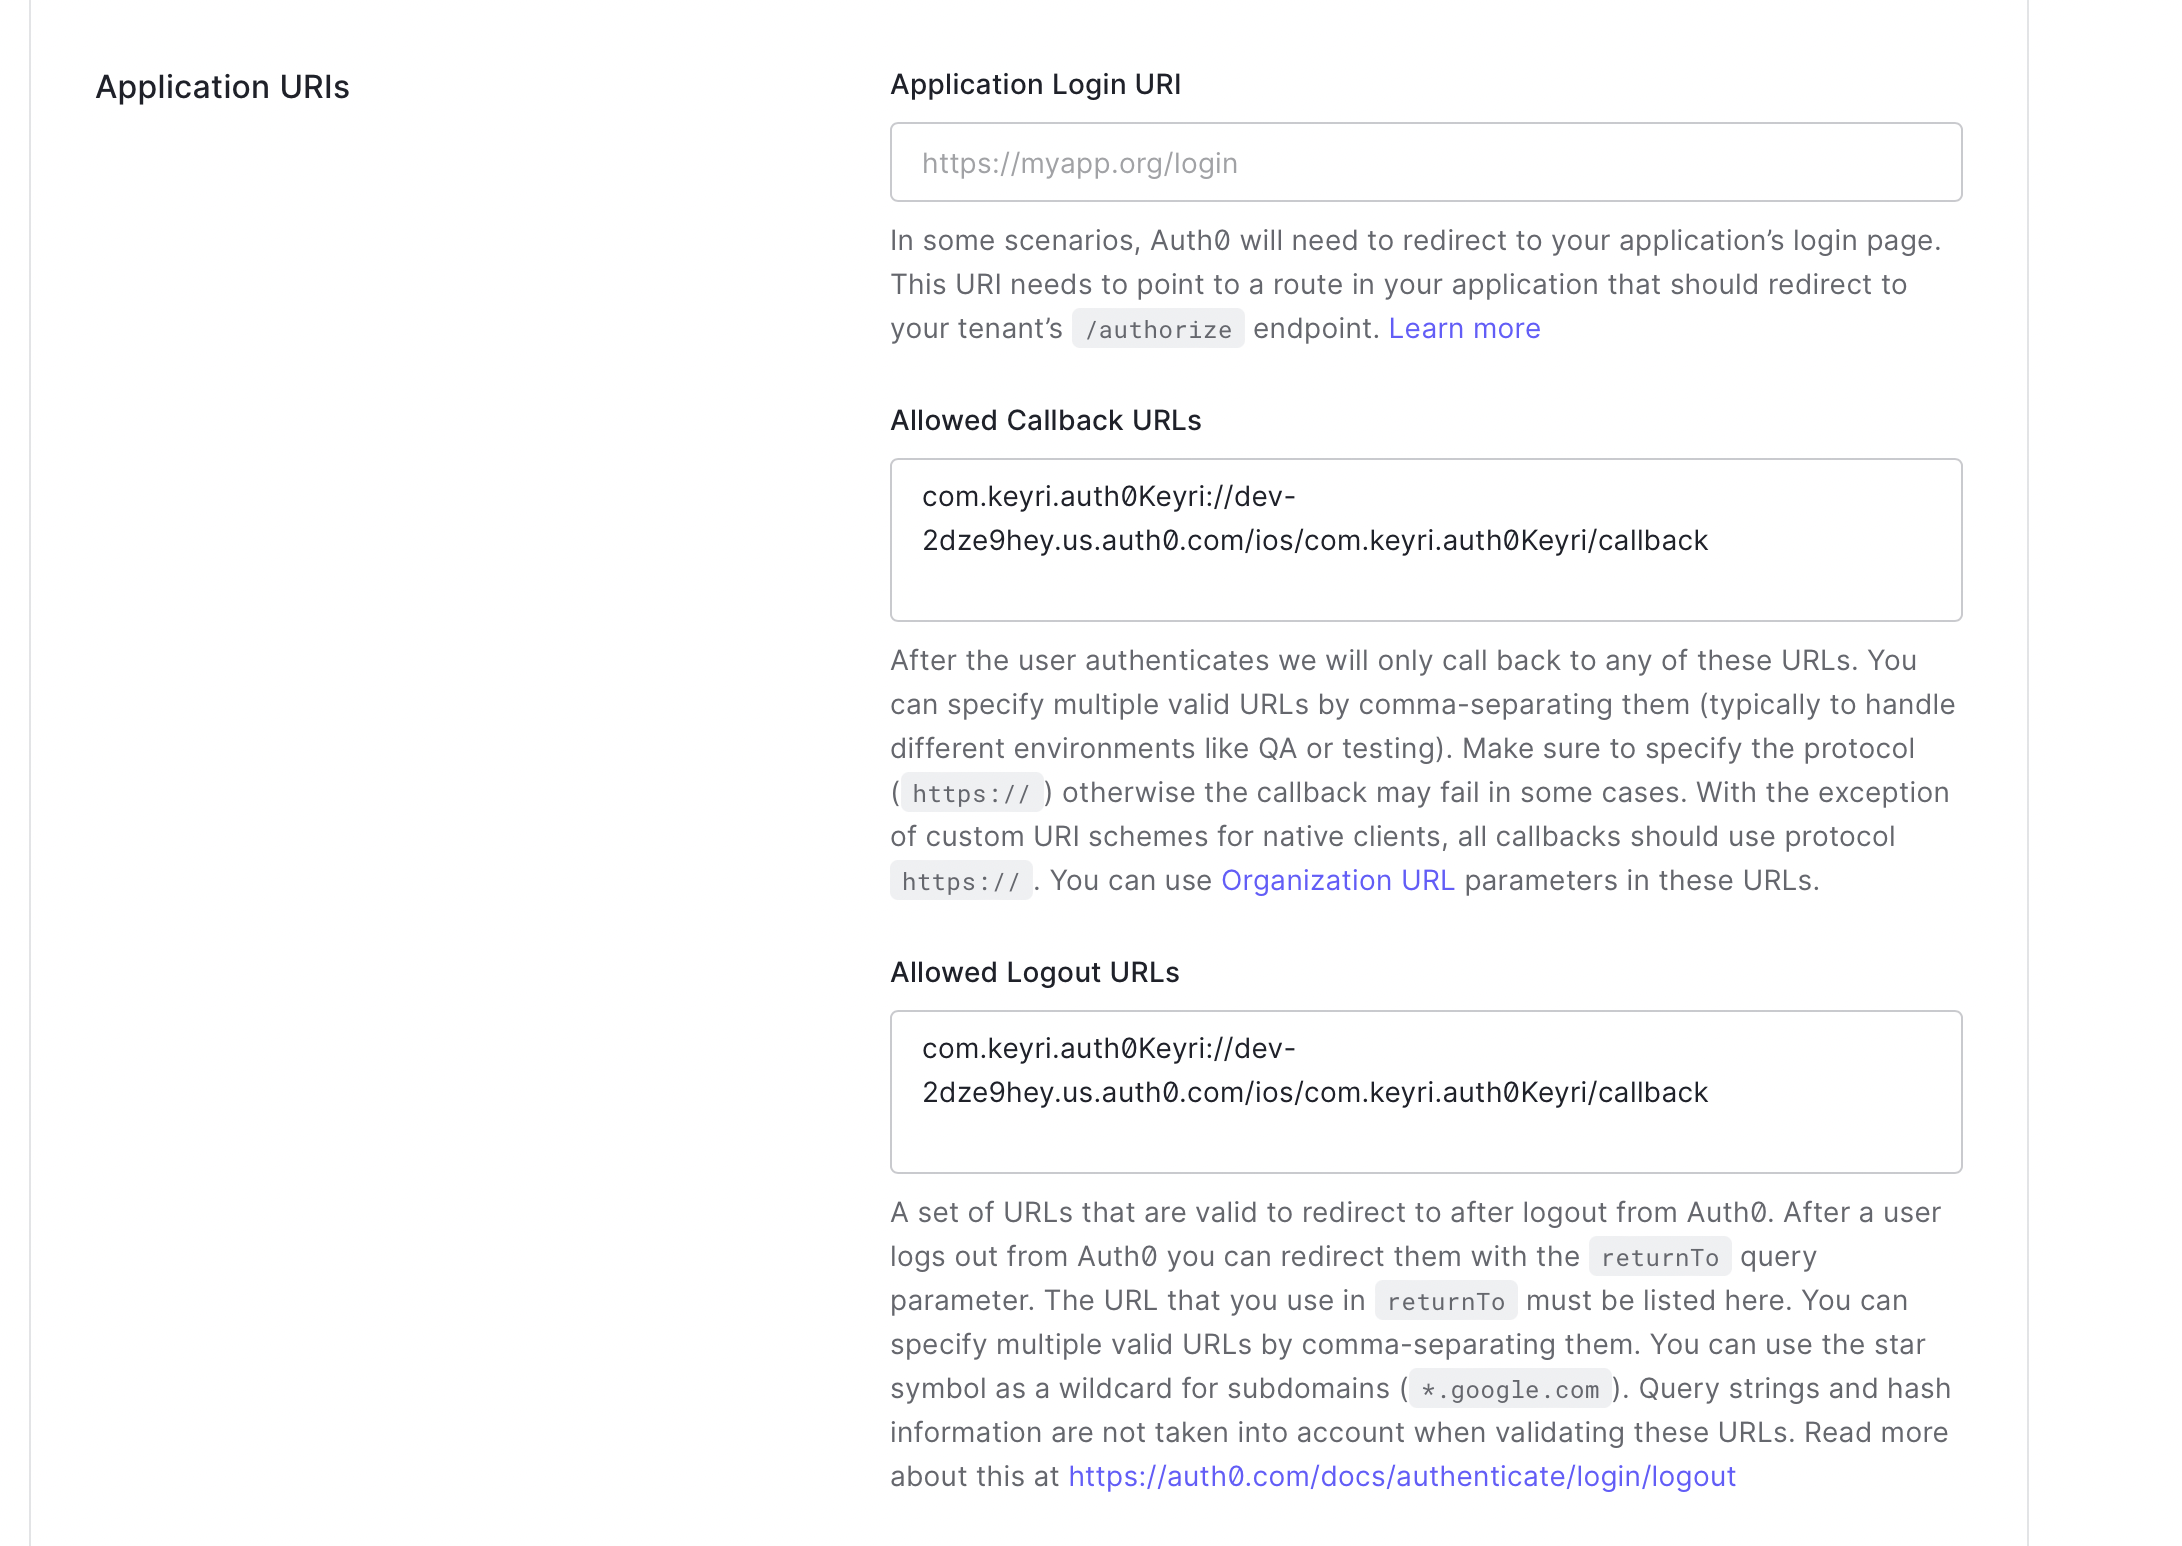
In the settings page, configure the logout and callback URL using the format provided in the prompt. For iOS (shown above) you simply need to use your bundle id with the Auth0 app id, and with Android, the pagage name is used in the same format.
Install Keyri and Auth0 SDKs
Then, using your preferred package manager for your application, install the Keyri and Auth0 SDKs. For iOS, we support Cocoapods and SPM, for Android, we support Gradle. We also support React Native and Flutter.
Code
The coding portion is quite easy. The steps are
-
Authenticate with Auth0 (note - it is important to use the "offline_access" scope, without it no refresh token will be provided)
-
Extract the refresh token from the returned credential
-
Utilize Keyri's built in API to send it to our service (this can be done with one line of code, as displayed below)
-
The App Key can be obtained from the Keyri developer portal
-
The token needs to be sent as a json string, i.e.,
{"refreshToken": "\[token"}
-
Auth0
    .webAuth()
    .scope("offline_access")
    .start { result in
        switch result {
        case .success(let credentials):
            print("Obtained credentials: \(credentials)")
            // 2
            print(credentials.refreshToken)

            let keyri = KeyriInterface(appKey: appKey, publicApiKey: publicApiKey, serviceEncryptionKey: serviceEncryptionKey)
            let payload = "{\"refreshToken\":\"\(credentials.refreshToken ?? "")\"}"
            print(payload)

            // 3
            keyri.easyKeyriAuth(payload: payload, publicUserId: username) { easyKeyriAuthRes in
                switch easyKeyriAuthRes {
                    case .success:
                        print("Successfully authenticated")
                    case .failure(let error):
                        print("Failed with: \(error)")
                }
            }
    }

}