Server-Side Authentication
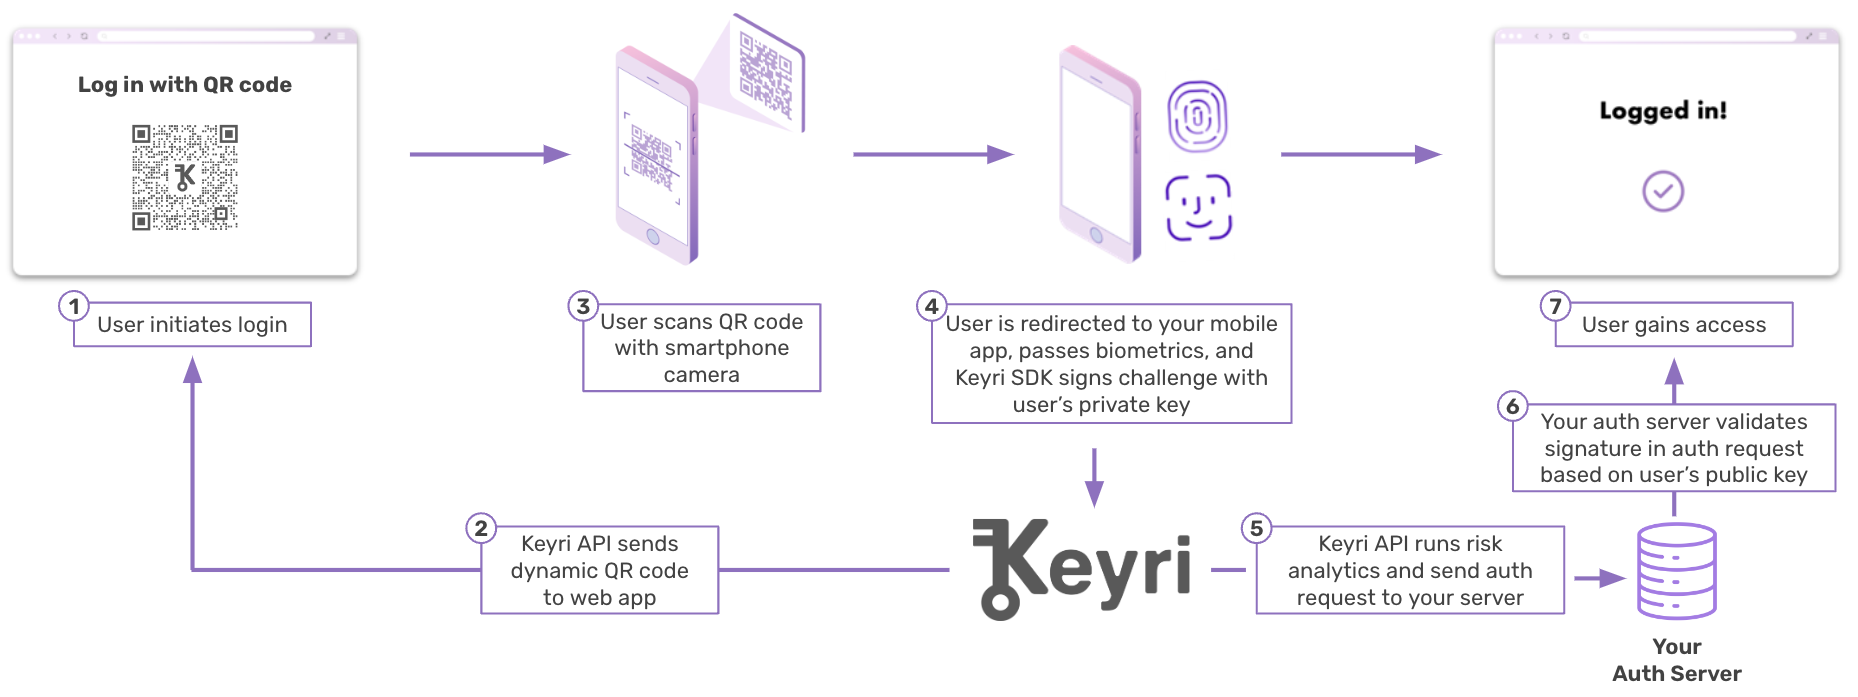
The Keyri server-side authentication flow is similar to WebAuthn - the user supplies your client app with their cryptographic signature, which you then validate against their public key which you have on file from their registration phase. This requires:
-
One additional field in your user database to hold the user's public key
-
One additional API route to receive the user's public key from your mobile app
-
One new backend auth case for signature verification
The primary benefit of this route is that it allows you to ensure that all of a given user's client devices are associated with different session tokens, which allows you to deauthorize individual devices. Additionally, the involvement of device-generated ECDSA signatures allows you to leverage mobile device fingerprinting and automatic, continuous authentication in the background without any user involvement.
Web Implementation
Keyri installation on your web page with server-side auth is broadly the same as that described in the widget quickstart, with the key difference being that the event listener must pass the data that it receives from the Widget along to your server for validation. Example below:
window.addEventListener('message', (evt) => {
  if (
    evt.data.keyri &&
    evt.data.data &&
    document.location.origin == evt.origin
  ) {
    const { data } = evt;
    if (!data.error) {
      // Pass the data from the widget to your backend
      let virtualForm = document.createElement('form');
      virtualForm.method = 'POST';
      virtualForm.action = '/keyriLogin';
      virtualForm['elements']['keyriPayload'] = data.data;
      document.body.appendChild(virtualForm);
      virtualForm.submit();
    } else {
      // Error handling...
      showErrorModal({ title: 'Uh Oh', body: 'Helpful Error Message' });
    }
  }
});
Backend
The following Node.js example demonstrates the basic backend setup required to run Keyri authentication. Simplistically, it assumes you have a database that only stores users' public keys, with each public key occupying its own row. This architecture supports multiple public keys for individual users, such as would be the case when users log into your service using multiple mobile devices. You can architect your backend setup however you would like - the only requirement for logging users in is verification of the SHA256 ECDSA signatures that the mobile app sends to your system through the Keyri mobile SDK, API, and Widget when the user scans the login QR code.
Registration
For registration, create an API endpoint that accepts the user's association key
(pubKey) whenever they register a new account in your mobile app or log in to
an existing account on a new mobile device.
const db = require('../db'); // Give this application access to your database
const express = require('express');

const app = express();

app.post('/keyriRegistration', (req, res) => { const pubKey = req.body.pubKey;
const username = req.body.username;

const query = 'INSERT INTO users (pubKey, username) VALUES (?, ?)';
db.run(query, [pubKey, username], function (err) { if (err) { return
res.status(500).json({ message: 'Sever Error' }); } return
res.status(200).json({ message: 'Registration Successful' }); }); });
Login
Login is based on ECDSA signature verification. The mobile app will send four pieces of data:
-
pubKey: The user's device-specific ECDSA public key in base64 -
username: The user's non-cryptographic identifier -
data: Timestamp_nonce -
signature: The ECDSA signature, a SHA256 digest, of thedata
const crypto = require('crypto');
const db = require('../db'); // Give this application access to your database
const express = require('express');
const session = require('express-session');

const app = express();

app.use(session({ secret: 'keyboard cat', cookie: { maxAge: 60000 } }));
// Look up the user's public key
app.post('/keyriLogin', (req, res) => {
  // The following four pieces of data come from the mobile and are decrypted by the Widget
  const { pubKey, username, data, signature } = JSON.parse(req.body.keyriPayload);

  const query = 'SELECT count(0) FROM users WHERE pubKey = ? AND username = ?';

  db.get(query, [pubKey, username], function (err, row) {
    if (err) {
      return res.status(500).json({ message: 'Sever Error' });
    }
    if (row.count === 0) {
      return res.status(400).json({ message: 'User not found' });
    }
    if (verifySignature(pubKey, data, signature)) {
      // Log username in - very very simple example
      req.session.username = username;
      req.session.loggedIn = true;
      return res.status(200).json({ message: 'Login Successful' });
    } else {
      return res.status(400).json({ message: 'Signature verification failed' });
    }
  });
});

const verifySignature = (pubKeyB64, data, signatureB64) => {
  // Make sure you received all the necessary data
  if (typeof pubKeyB64 === 'undefined' || typeof data === 'undefined' || typeof signatureB64 === 'undefined') {
    throw new err('Not Enough Data Provided to Validate Signature');
  }
  // Make sure you received a valid timestamp
  const timestamp = parseInt(data.slice(0, 13), 10);
  const now = new Date().getTime();

  if (Number.isNaN(timestamp)) {
    throw new err('Invalid timestamp');
  }
  // Make sure the timestamp is recent, in order to throw off replay attacks
  if (Math.abs(now - timestamp) > 60_000) {
    throw new err('Login request timed out - please try again');
  }
  // The actual cryptographic verification
  const pubKey = crypto.createPublicKey(`-----BEGIN PUBLIC KEY-----\n${pubKeyB64}\n-----END PUBLIC KEY-----`);
  try {
    const verify = crypto.createVerify('sha256');
    verify.update(Buffer.from(data));
    verify.end();
    const verified = verify.verify(pubKey, Buffer.from(signatureB64, 'base64'));
    return verified;
  } catch (e) {
    throw new err('Something failed when trying to verify signature',
    });
  }
};
Mobile
Please refer to the Mobile SDK documentation for a full description of installation and configuration.
Registration
The goal with registration is to make sure that the user's public key present on their phone is also present in your database.
Given that keys are not necessarily synced across all of a user's devices, you should go through the "registration" flow when users log into existing accounts on their phones as well as when they create new accounts. As a result, your database will likely include multiple public keys for the same user - one for each of their mobile devices, meaning multiple tablets and phones.
Please use the following methods of the mobile SDK to complete the registration process:
-
getAssociationKey(publicUserId: String): This will either retrieve the public key for a given user or indicate that a public key for that user does not exist on that specific device. -
generateAssociationKey(publicUserId: String): Use this to generate a new key pair for the user, followed by getAssociationKey() to return the public key as a string. Once you have the public key string, POST it to the registration endpoint you created on your backend in conjunction with the user's public id / username.
Login
Login refers to the stage at which a user who is logged into your app on their
mobile device scans a Keyri QR code to log in on the device on which the QR code
is displayed. You can use methods like easyKeyriAuth(), initiateQrSession(),
or processLink() to complete the login process. Note that the four data items
listed in the backend login endpoint above (and reproduced below) are strictly
necessary to include in the payload.
-
pubKey: Retrieve this usinggetAssociationKey(publicUserId: String) -
username: This is simply the public user ID with which the public key is associated -
data: This is the current Unix epoch and a random number, concatenated with an underscore in between -
signature: Generate the signature withgetUserSignature(publicUserId: String, data: String), which data being the timestamp_nonce listed above